Yeniden derlemek OpenSSL 1.1 & NGINX 1.25 için TLS 1.3 (CentOS 7), daha önce sunucuya yüklediğiniz senaryoyu izleyerek o eski sürüm openssl nginx hizmetiyle ilişkili.
Daha spesifik olarak, etkinleştirebilmek için OpenSSL 1.1.1t hizmet için NGINX, daha eski bir sürümle çalışır. OpenSSL 1.0.2k.
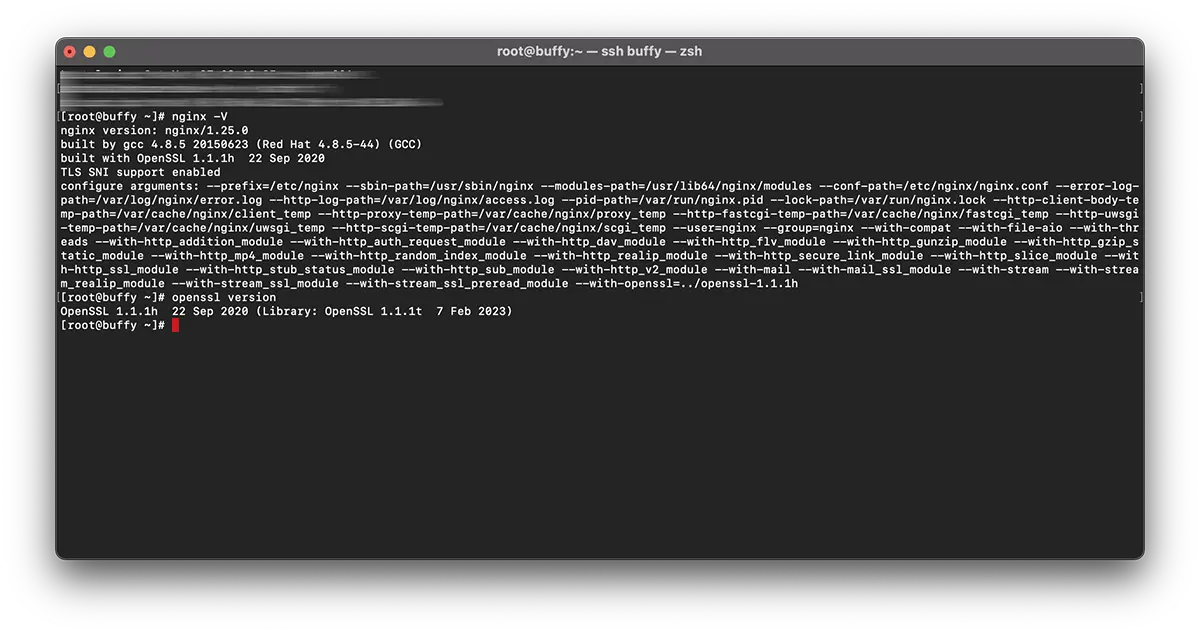
# nginx -V
nginx version: nginx/1.25.0
built by gcc 4.8.5 20150623 (Red Hat 4.8.5-44) (GCC)
built with OpenSSL 1.0.2k-fips  26 Jan 2017
TLS SNI support enabled
# openssl version -a
OpenSSL 1.1.1t 7 Feb 2023Bu, iki farklı sürümün olduğu anlamına gelir. OpenSSL. “ tarafından sisteme yüklenen bir sürümyum"(1.0.2k-fips) ve bir sürüm OpenSSL manuel derleme ile kurulur (openssl 1.1.1t).
Klasik olarak, çoğu yeniden yüklemeyi önerir'OpenSSL' sunucu düzeyinde. Bu, komutun yürütülmesini gerektirir: yum remove openssl. Ama burada büyük bir sorun var. Eski sürümün kaldırılmasıyla OpenSSL, bazı bağımlı uygulamaları da kaldırmanız gerekebilir. Örneğin: nginx, MariaDB-server, cerbotArtı diğer birçok.
Daha basit bir çözüm yeniden derlemektir openssl 1.1 & nginx 1.25 için TLS 1.3.
Içerik
Eğitimi yeniden derleme OpenSSL 1.1 & NGINX 1.25 için TLS 1.3 (CentOS 7)
Örneğimde, yeniden derleme nginx/1.25.0 & OpenSSL 1.1.1h kitapçıları kullanmak OpenSSL 1.1.1t.
NGINX'i yeniden derleyin.
1. Dosyayı oluşturun: nginx-with-tls13-compile.sh
sudo nano nginx-with-tls13-compile.shbetiği eklediğiniz yer:
#!/bin/bash

## nginx
NGINX=nginx-1.25.0.tar.gz

if [ ! -f "${NGINX}" ];then
    wget https://nginx.org/download/${NGINX}
fi

ND=$(basename $NGINX .tar.gz)
if [ ! -d "${ND}" ];then
    tar zxvf ${NGINX}
fi

cd ${ND}

## pre require package
## yum install gcc pcre-devel zlib-devel

./configure --prefix=/etc/nginx \
    --sbin-path=/usr/sbin/nginx \
    --modules-path=/usr/lib64/nginx/modules  \
    --conf-path=/etc/nginx/nginx.conf \
    --error-log-path=/var/log/nginx/error.log \
    --http-log-path=/var/log/nginx/access.log \
    --pid-path=/var/run/nginx.pid \
    --lock-path=/var/run/nginx.lock \
    --http-client-body-temp-path=/var/cache/nginx/client_temp \
    --http-proxy-temp-path=/var/cache/nginx/proxy_temp \
    --http-fastcgi-temp-path=/var/cache/nginx/fastcgi_temp \
    --http-uwsgi-temp-path=/var/cache/nginx/uwsgi_temp \
    --http-scgi-temp-path=/var/cache/nginx/scgi_temp \
    --user=nginx \
    --group=nginx \
    --with-compat \
    --with-file-aio \
    --with-threads \
    --with-http_addition_module \
    --with-http_auth_request_module \
    --with-http_dav_module \
    --with-http_flv_module \
    --with-http_gunzip_module \
    --with-http_gzip_static_module \
    --with-http_mp4_module \
    --with-http_random_index_module \
    --with-http_realip_module \
    --with-http_secure_link_module \
    --with-http_slice_module \
    --with-http_ssl_module \
    --with-http_stub_status_module \
    --with-http_sub_module \
    --with-http_v2_module \
    --with-mail \
    --with-mail_ssl_module \
    --with-stream \
    --with-stream_realip_module \
    --with-stream_ssl_module \
    --with-stream_ssl_preread_module \
    --with-openssl=../$(basename $OPENSSL .tar.gz)

make

sudo make install

nginx -V
Yeni dosyayı kaydedin.
2. Yeni yürütülebilir dosyayı oluşturun:
chmod +x nginx-with-tls13-compile.shYeniden yazmak nginx.service
3. Şunun bir yedeğini alın: nginx.service.
cat /lib/systemd/system/nginx.service > /srv/nginx_service.txt(için istediğiniz herhangi bir yolu seçebilirsiniz nginx_service.txt)
4. Hizmet için dosya oluşturun nginx: nginx.service
sudo nano nginx.service5. Dosyada yeni dosya nginx.service satırları ekleyin:
##  /lib/systemd/system/nginx.service

[Unit]
Description=The NGINX HTTP and reverse proxy server
After=syslog.target network.target remote-fs.target nss-lookup.target

[Service]
Type=forking
PIDFile=/run/nginx.pid
ExecStartPre=/usr/sbin/nginx -t
ExecStart=/usr/sbin/nginx
ExecReload=/usr/sbin/nginx -s reload
ExecStop=/bin/kill -s QUIT $MAINPID
PrivateTmp=true

[Install]
WantedBy=multi-user.target
6. Dosyayı şuraya kopyalayın:daemon".
sudo cp nginx.service /lib/systemd/system/nginx.service7. Dosya kopyalandıktan sonra, şu komutu kullanarak dosya izinlerini güncelleyin:
sudo chmod 644 /lib/systemd/system/nginx.service8. Yapılandırmayı yeniden yükleyin systemd komutu kullanarak değişiklikleri dikkate almak için:
sudo systemctl daemon-reload9. Yeniden başlat ngnix.
sudo systemctl restart nginxYeniden derlemek OpenSSL / NGINX için TLS 1.3
10. Dosyaların bulunduğu aynı klasörde nginx-with-tls13-compile.sh şi nginx.service, yeni bir dosya oluşturun: openssl-1.1-compile.sh.
sudo nano openssl-1.1-compile.shKomut dosyasını ekleyin:
#!/bin/bash

## Compile OpenSSL
OPENSSL=openssl-1.1.1h.tar.gz

DONE=openssl-compile-done

if [ ! -f "${DONE}" ] ;then
    wget https://www.openssl.org/source/${OPENSSL}

    tar zxvf ${OPENSSL}

    cd $(basename $OPENSSL .tar.gz)

    ./config shared no-idea no-md2 no-mdc2 no-rc5 no-rc4 --prefix=/usr/local/

    make

    sudo make install

    cd ..

    touch ${DONE}
fi

export LD_LIBRARY_PATH=$LD_LIBRARY_PATH:/usr/local/lib64/

read -n1 -r -p "$(/usr/local/bin/openssl version) - Press any key to continue..." key

source ./nginx-with-tls13-compile.sh
Yer değiştirmek "OPENSSL=openssl-1.1.1h.tar.gz” yüklemek ve NGINX ile yeniden derlemek istediğiniz sürüm ile.
11. Komut dosyasını çalıştırılabilir yapın:
chmod +x openssl-1.1-compile.sh12. Şu komutu çalıştırın:
./openssl-1.1-compile.shYeniden derleme işleminin tamamlanmasını bekleyin OpenSSL & NGINX.
Size yardımcı olabileceğimiz veya yapılacak eklemeler varsa, yorum bölümü açıktır.